|
Computer Aided Pattern Design
by Don McCunn
Grading PatternsThere are two approaches for this approach to grading patterns. The first approach grades patterns for the torso using measurements of the body. The second approach grades patterns that are added to the torso patterns such as collars and sleeves. This second approach is used after the design for the torso has been finalized and graded. It verifies the lengths of the collar and sleeve seams will match the length of torso's seams. This page describes grading the torso patterns. The Width of the patterns is determined by the Shoulder Width and the size by the Circumference of the Bust. The Length of the pattern is based on the length of Center Back. The measurements are of bodies not patterns. This means they can be used for any Master Patterns of a specific design. Changing the Length is not essential because the length within a given size can vary as much as 4" or more whereas Vogue patterns changes the Length from size 8 to 16 by slightly over one inch. Changing the Length is a factor that must be considered for the design being graded and the intended market. In these instructions Grading is done by taking the Medium size of a pattern and Grading it larger and smaller by the values in a Grading Chart. For example, to Grade a Vogue pattern from size 14 to 8, the Shoulder Width is reduced by 95%. The quarter-scale version of these patterns used in these instructions can be downloaded. The zip file contains Studio files for the torso, collar, and sleeve. The patterns are shown without seam allowances which must be added after the grading has been completed, see Adding Seam Allowances.
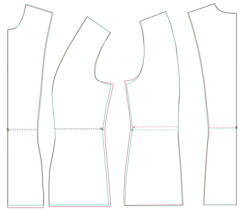
In the images below the purple and green lines are the actual shape of the Vogue V9029 patterns. The red lines are the result of grading the medium size 14 to size 8 and size 14 to 16 following the instructions described here.
Two examples are included here. One Grading Chart was developed from measuring the Vogue V9029 shirt and V1009 Fitting Shell. The other is a chart that Lindsey and I developed for her client base. We decided to not change the length as she can adjust the length for specific clients using the Altering RTW to MTM instructions. Percentages are used rather than fixed measurements so the Grading Chart can be used for different designs. The Center Back dimensions are for quarter scale. For additional charts for different body types see Grading Charts. Vogue Grading Chart
Lindsey's Grading Chart
|

Summary of Steps
(Grade the Front patterns separately from the Back.)
See Also
Copyright © 2025 by Donald H. McCunn
|